Wheel Specs
SSR / GT2 / 17×8.5 / +48mm / 5×100 / 16 lbs
Tire Specs
BFGoodrich / Comp-2/AS / 255/45/R17
With my tires delivered and a winter storm looming, I messaged my friend David who works at an automotive shop to see if he could fit me in. As luck would have it, the storm kept people at home. So I loaded up my WRX with the tires and wheels and headed to his shop.
Mounting and Balancing
Since it was a slow day he let me watch and shoot him mounting and balancing the tires. After personally removing tires from the SSR wheels to paint them, I have a newfound appreciation for the mounting and balancing process.
https://www.instagram.com/p/BeBnM8hFSU8/
With the tires mounted and the wheels balanced, it was time to lift the car up and swap the wheels out. While many people love the Tarmac IIs on the Bugeye, I never cared for the combination. After many attempts to paint them the right color, in an attempt to convince myself that I liked them, my affinity for these wheels never lasted more than a few weeks.
In general, I am not a huge fan of multi-spoke wheels; there are some exceptions, the 04-07 STi BBS wheels being one of the biggest. However, the Tarmac IIs had some positive qualities; they cleared Brembos and they were somewhat light.
With the car in the air, the Rotas came off for hopefully the last time. While the Rotas were on the ground it was time to do a comparison shot between the 235s on the Rotas and the 255s on the SSRs.

While most people try to run the narrowest tire they can fit on a wheel, I like to run the widest tire I can before significant tire pinch occurs. This will give a wider tire patch along with extra wheel protection. Not to mention I think it looks great. 
Installation
With all four Rotas on the ground, it was time to install the SSR GT2s. After installing a wheel, David double checked the inside clearances; they were pretty tight! Less than a finger width in some areas up front. Fender clearance was fine up front. 
In the rear, there was a similar story. Tight clearance with the struts, however, the fender clearance was tighter as I was running less camber than up front.
In this pic, you can see how close or flush the tire is with the rear fender. My rear fenders were already had a mild roll. If I had camber plates I would have added a half a degree or so of negative camber to clear the fenders.
Overall, all the planning was starting to pay off. There were no major surprises up to this point.
Having been an automotive enthusiast for almost 20 years, I have grown accustomed to having something coming up, yet things were going pretty close to plan. That usually means I overlooked something significant. And yet, the car was on its own weight without any issues. I’m beginning to think I know what I am doing. 🙂
Alignment
Next up, it was time for the alignment. I’ve never seen an alignment performed in realtime so this was an interesting process to witness. 


Once the sensors on the car were calibrated with the machine, David printed my pre-alignment settings out. The camber was fine but my toe at opposite corners was off. The front caster was much higher than I was expecting. My previous best was 3.4 degrees of caster.
David quickly sorted out the toe settings and put the car back on the ground.
Final Settings.
First Impressions
While we were in the shop it began to snow. Since I have never run these tires before, I was getting anxious about driving home before the snow started piling up.
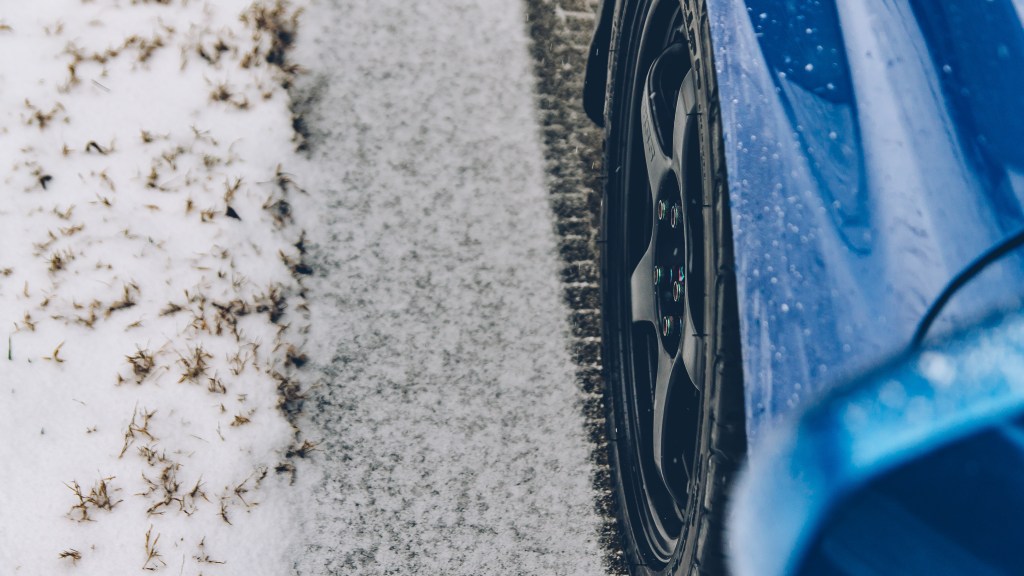
Outside of the shop, I couldn’t believe how much these wheels changed the look of the Bugeye. The tires look meaty and aggressive within the stock fenders.

I didn’t have a ton of time to admire the new setup. I needed to head home before the roads covered up with snow and inexperienced drivers. 
The initial drive out of the parking and on to the road, the steering felt better than before; a little bit more direct. I’m not sure why as wider tires tend to reduce steering feel. The throttle felt a little bit more responsive than before; that could be the effect of lighter wheels or it could just be my imagination.
The Drive Home
By the time I got on the highway, the snow began to stick to and coat the roads; not my preferred condition to test out new tires but it was the situation I found myself in. I didn’t detect any hint of slippage on my route home. Brake checks never triggered ABS and shots of boost never threatened my Bugeye’s composure. 
Most people were moving along fine while others were downright terrified of the white stuff. As a car enthusiast, I tend to notice worn components on cars as I walk through a random parking lot. I’ve noticed more bald tires on late model cars than I would like to see. This is one of the reasons stopped switching to a winter tire setup and just opted to stay home when it snows.
After leaving the highway I had to navigate the road to my house. There’s a corkscrew section that is always pretty sketchy in the snow but the BFGs handled it fine. 
However, a new challenger arrived – my driveway.

The Driveway Shoot
It made it up no problem. 
More photos


I was pretty concerned with the fitment up front so I rolled my fenders in anticipation of clearance issues. The front was fine although I won’t be able to add any more negative camber with the eccentric strut bolt as the tire will rub the strut. I will need an adjustable top hat to gain any more negative camber. And I still need to figure out what to do with my fender liners. They are hanging down since they don’t have a lip to attach to.

The following day I took some additional photos after Winter Storm Hunter was over.


I really like how the new setup looks and time will tell how well they perform. However, classes have started back up and my time to work on the Bugeye will be extremely limited. But so far I am happy with how things have turned out.
Cheers!
